
I should note that this isn't a beginner's guide to neither brushes or gradients. Maybe we'll cover those basics later.
Method 1: Linked Layers
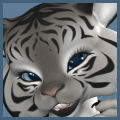
So, I have this little tag that I made with a Poser render I want to add some magic effect to for the purposes of this tutorial. So, I'm going to bring the .jpg in PSE. It's nothing really noteworthy, but it will do...

Here's a look at the layer palette. It's a flatted .jpg so there is just one layer. Your image may have layers, and it should still work, as far as I've experimented. Just name your layers and pay attention to what you link together.

The first thing we need to do is add a new layer where we will eventually "paint" with the brush tool.

Rename the layer.This isn't a must, but I strongly advise getting in the habit of naming layers for their contents.

I've renamed my layer "Brush". Now, we need to add another layer above the Brush layer for the gradient.

I've renamed my second layer "Gradient" as you can see.

The next bit is a bit tricky and may take a couple of practice tries. So, read on a bit before you try it.
Now, go to your layers palette. Position your mouse cursor between the Brush and Gradient Layers. Press the ALT key on the keyboard until a little chain icon appears:

Do NOT release the ALT Key. Left-click with the mouse once. Your Brush layer and Gradient layers should now be "linked".

You can now go back to your Brush layer and paint there with any brush. Then, you can apply a gradient to your gradient layer. Here are what my layers look like.

I have a could of gradient painted brush effects on my image now. You should as well.

Method 2: Selection
The second method is easier at first glance, but may not give you as much control over layered images that you want to archive. Add a new layer to your image and name it Brush. Choose your brush and paint whatever you want on your image or canvas.

Now go up to the layers palette and hold the CTRL key and left click on the thumbnail of your Brush layer once.

You should now have a selection tightly around your your painted brush pattern. It kind of looks like "marching ants".

You can now add a gradient to your selection. I suggest creating a new layer and then adding a gradient on that layer. When you're finished, use the keyboard shortcut CTRL + D to de-select.


No comments:
Post a Comment